Welcome, fellow sewing enthusiasts! Grab a cup of tea, settle into your favorite sewing chair, and let’s talk about something that can completely transform your handmade wardrobe. Today, we are diving deep into the wonderful world of nahttypen!
If you are wondering what that word means, it is the German term for “seam types.” Why use the German term? Because sewing is a truly global craft, and exploring international terminology opens up a whole new world of tailoring techniques! Learning about different nahttypen is an absolute game-changer. I remember the very first time I made a delicate silk blouse. I used a standard stitch, left the raw edges exposed, and after one trip through the washing machine, it unraveled completely. I was heartbroken! That disaster taught me a valuable lesson: choosing the right nahttypen is just as important as choosing the perfect fabric.
Whether you are a complete beginner sewing your first tote bag or an advanced sewist tackling a tailored coat, mastering various nahttypen will elevate your projects from homemade to professional. Let’s explore these fabulous seams, discover when to use them, and share some amazing tips for perfectly finished garments!
What Exactly Are Nahttypen and Why Do They Matter?
Before we get to the sewing machine, let’s talk about why we care about nahttypen. A seam is simply the line where two pieces of fabric are held together by thread. But it is never just a simple line! The way you construct that seam determines the strength, flexibility, and overall beauty of your garment.
Using the correct nahttypen ensures that your clothes hang properly on the body. It prevents delicate fabrics from fraying and gives heavy fabrics the structural support they need. Plus, there is nothing quite as satisfying as flipping a handmade dress inside out and seeing an interior that looks just as pristine as the exterior!
Let’s look at the most essential nahttypen every sewist needs to know. I promise you will want to try all of these on your next project!
You Might Also Like: Matarecycler Recycling Solutions for a Sustainable Future
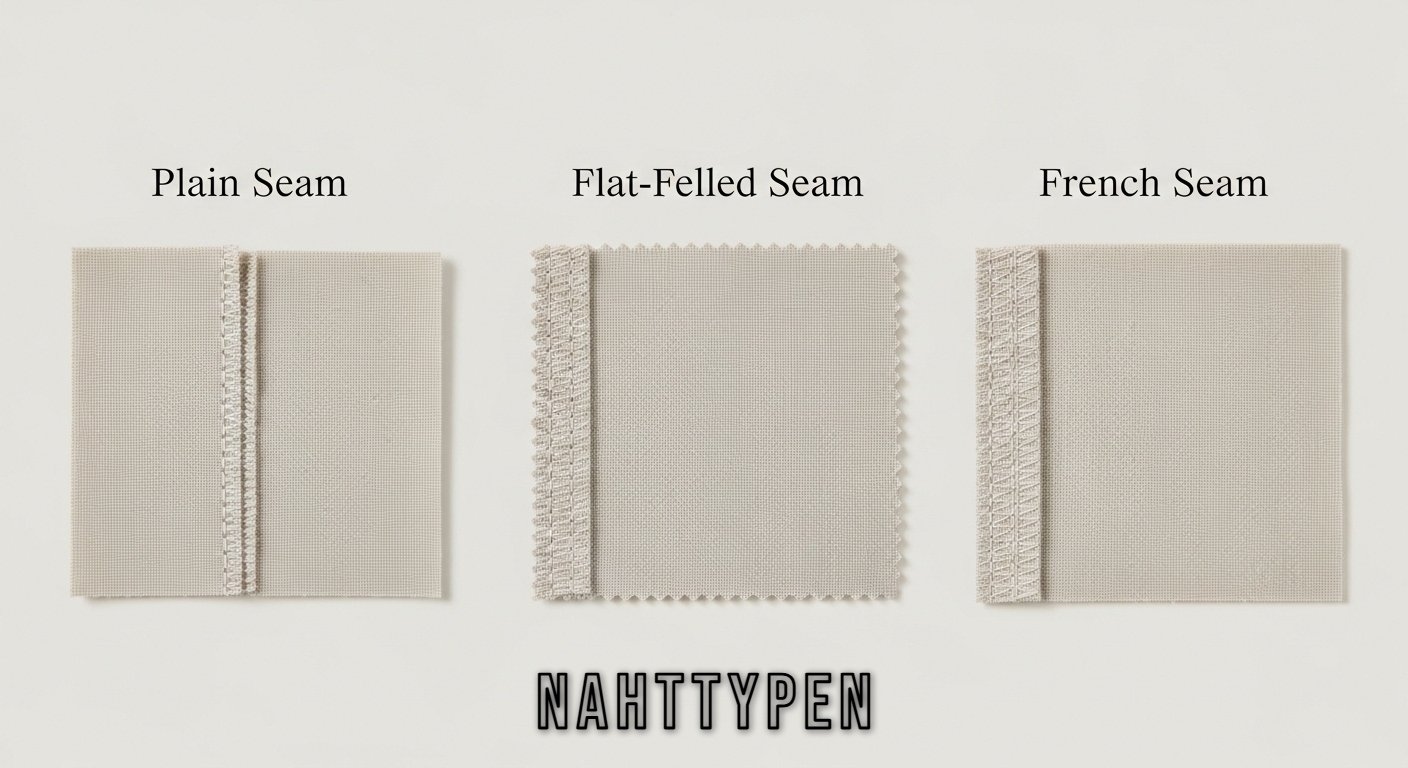
The Classic Plain Seam: Your Trusted Best Friend
Let’s start with the absolute basics. The plain seam is the most common of all nahttypen, and you probably use it all the time without even thinking about it. You place the right sides of your fabric together and stitch a straight line down the edge, usually with a 5/8-inch (1.5 cm) seam allowance.
It is incredibly easy, fast, and wonderfully versatile! I use the plain seam on almost everything, from crisp cotton skirts to cozy flannel pajama pants.
Best Applications for the Plain Seam
- Woven fabrics: Cotton, linen, and wool respond beautifully to a simple straight stitch.
- Side seams: It creates a smooth, flat finish that does not add bulk to the sides of your body.
- Lined garments: Because the raw edges will be hidden by a lining, a plain seam is all you need!
Helpful Tips for a Perfect Plain Seam
Do not skip the finish! Because the raw edges are exposed, they will eventually fray. I highly recommend finishing the raw edges with a zigzag stitch or pinking shears. And here is my golden rule: always press your seams open! Pressing your nahttypen flat with a hot iron is the magical secret to making your garments look professionally made rather than lovingly crafted in your dining room.
The Magical French Seam: Pure Luxury
Oh, the French seam! This is my absolute favorite of all the nahttypen. It is completely enclosed, meaning all the raw edges are tucked safely inside the seam itself. No fraying, no messy threads, just pure, clean perfection.
When I first heard of a French seam, I thought, “What? How do you hide the edges inside the seam?” It sounded like magic! But the process is actually surprisingly simple once you get the hang of it. You sew the fabric wrong sides together first, trim the seam allowance, and then fold it over and stitch it again right sides together.
Best Applications for the French Seam
- Sheer fabrics: Chiffon, organza, and lightweight silks look stunning with French seams because you can see the seam through the fabric. A messy raw edge would completely ruin the look!
- Delicate blouses: It adds a touch of high-end luxury to everyday wear.
- Unlined jackets: It creates a beautifully neat interior.
Helpful Tips for a Perfect French Seam
Do not use this technique on heavy fabrics! A French seam on denim or heavy wool will create a thick, stiff ridge that looks incredibly bulky. Stick to lightweight fabrics for the best results. Trimming your initial seam allowance down to a scant 1/8 inch is crucial. If you leave it too wide, those pesky little threads will poke through your final stitch line on the right side of the garment!
The Sturdy Flat-Felled Seam: Built to Last
Have you ever looked at the inside of your favorite pair of store-bought jeans? That double row of heavy stitching running down the side is a flat-felled seam! Out of all the nahttypen, this one is the ultimate champion of durability.
A flat-felled seam is created by interlocking the two edges of the fabric and stitching them down flat. It encapsulates the raw edges completely, just like the French seam, but it lies completely flat against the garment. This provides incredible strength and stability.
Best Applications for the Flat-Felled Seam
- Denim and canvas: Perfect for jeans, sturdy jackets, and heavy-duty bags.
- Activewear: Great for hiking pants or gear that needs to withstand a lot of movement and friction.
- Men’s shirts: The armholes and side seams of classic button-down shirts often use this strong finish.
Helpful Tips for a Perfect Flat-Felled Seam
Take your time when pressing! Creating a flat-felled seam requires folding the raw edge over and pressing it down before topstitching. A hot iron and a lot of steam will be your best friends here. I also recommend using a heavier thread for the topstitching to make those classic nahttypen really pop. It gives your project that authentic, store-bought look!
The Overlock Seam: The Stretchy Savior
If you love sewing with knits, you need the overlock seam in your life! This is typically created using a serger machine, which trims the raw edge of the fabric while simultaneously wrapping it in multiple threads.
When I bought my first serger, it completely revolutionized the way I approached nahttypen. It sews the seam and finishes the edge in one lightning-fast step! Plus, the interlocking threads stretch with the fabric, which prevents your seams from popping when you put on a fitted t-shirt or a pair of leggings.
Best Applications for the Overlock Seam
- Knit fabrics: Jersey, French terry, and spandex require seams that can stretch.
- Quick finishes: If you are in a hurry, you can use an overlock stitch on woven fabrics just to finish the raw edges quickly.
- Sweatpants and hoodies: It provides a strong, flexible seam for loungewear.
Helpful Tips for a Perfect Overlock Seam
Always test your stitch on a scrap piece of fabric first! Sergers have multiple tension dials, and you want to make sure the threads are perfectly balanced before you cut into your actual project. If you do not have a serger, do not worry! You can mimic these nahttypen on a standard sewing machine using a stretch stitch or a wide zigzag stitch.
The Bound Seam: A Beautiful Surprise
Let’s talk about a seam finish that is so beautiful, you will want to show people the inside of your clothes! The bound seam uses bias tape to wrap around the raw edges of your seam allowance. It is a fantastic way to add a hidden pop of color or a fun pattern to the inside of a garment.
Best Applications for the Bound Seam
- Heavy fabrics: When a French seam would be too bulky, a bound seam is the perfect elegant alternative.
- Unlined coats and jackets: It creates a gorgeous, high-end finish that looks incredible when your coat blows open in the wind.
- Armholes and necklines: Bias binding is incredibly flexible and easily navigates curves.
Helpful Tips for a Perfect Bound Seam
Make your own bias tape! While store-bought bias tape is convenient, making your own out of a lightweight cotton or silk allows you to completely customize the look of your nahttypen. I highly recommend using a bias tape maker tool; it speeds up the pressing process and ensures a perfectly uniform width.
Pro Tips for Perfect Nahttypen Every Time
Now that we have covered the best nahttypen to use in your sewing projects, let’s talk about some universal tips that will make all of your seams look absolutely flawless!
1. Never Underestimate the Power of the Iron
I simply cannot emphasize this enough! Pressing is 50% of sewing. Whenever you sew a seam, you must press it to set the stitches into the fabric, and then press the seam open or to the side. It makes a massive difference in the final look.
2. Choose the Right Needle
Using the wrong needle can ruin your nahttypen before you even begin. Use a ballpoint needle for knits, a sharp microtex needle for delicate silks, and a heavy-duty denim needle for thick canvas. Change your needle after every major project to ensure it is always sharp!
3. Quality Thread is Essential
Bargain bin thread will break, tangle, and create messy seams. Invest in a high-quality polyester or cotton thread. Your machine will be happier, and your nahttypen will be much stronger!
4. Pin Generously
Do not let your fabric slide around! Use fine glass-head pins to secure your fabric pieces together before sewing. If you are working with slippery fabrics like satin, consider using sewing clips instead to prevent leaving holes in the delicate material.
Final Thoughts on Your Sewing Journey
Exploring different nahttypen is such an exciting part of the sewing journey! Every time you try a new technique, you are adding a valuable tool to your creative toolbox. Do not be afraid to practice on scraps before committing to your final garment. Remember, every master tailor started exactly where you are right now!
Whether you are dreaming of perfectly flat-felled jeans or luxurious French-seamed silk pajamas, mastering these nahttypen will give you the confidence to tackle any pattern that catches your eye. So thread up your machine, pick out a gorgeous fabric, and get ready to sew something spectacular. Happy sewing, everyone!